
[nest.js + next.js] 가계부 만들기 5 - nest-next 패키지로 서버 통합하기
RELATED POSTS
nest.js + next.js 가계부 만들기
- 1. nest.js + next.js installation
- 2. antd 설치 및 레이아웃 커스터마이징
- 3. typeorm 설치와 mariaDB(mysql) 연동
- 4. swagger 설치와 간단한 crud api 개발
- 5. nest-next 패키지로 서버 통합하기
1. why nest-next?
지금까지 달려오면서,
- NEXT.js - antD
- nest.js - typeorm, mariaDB, swagger
이렇게 나눠서 개발하고, 결과를 확인할 때도 각각의 프로젝트를 실행하는 서로 다른 명령어를 사용하였습니다. nest-next는, 두개의 서버를 하나로 통합해줍니다.
nest-next provides a nestjs module to integrate next.js into a nest.js application, it allows the rendering of next.js pages via nestjs controllers and providing initial props to the page as well.
로직은 이러합니다. 우리가 요청을 보내면 그 요청은 제일 먼저 controller로 들어오겠죠? 그럼
@Render를 이용하여, pages폴더에 있는 어떤 page를 보여줄지 지정하는 것입니다. 그리고 controller에서 보낸 데이터를 해당 페이지에 뿌려주게 됩니다.
데이터를 보내는 과정은 다음 포스팅에서 알아보기로 하고, 오늘은 서버 통합까지만 해보겠습니다.
2. nest-next package 설치
먼저 설치를 위해 아래를 터미널에서 실행해봅시다.
$ yarn add nest-next
3. app.module.ts 수정
nest-next의 렌더모듈을 추가해줍니다.
//./src/app.module.ts
import { Module } from '@nestjs/common';
import { AppController } from './app.controller';
import { AppService } from './app.service';
import { TypeOrmModule } from '@nestjs/typeorm';
import { User } from './entities/user.entity';
import { Record } from './entities/record.entity';
import { RecordsModule } from './records/records.module';
import { RenderModule } from 'nest-next'; //추가된 부분1
import Next from 'next'; //추가된 부분2

@Module({
  imports: [
    TypeOrmModule.forRoot({
      type: 'mysql',
      port: 3306,
      username: 'root',
      password: 'qwer',
      database: 'housekeeping_book',
      entities: [User, Record],
      synchronize: true,
    }),
    RenderModule.forRootAsync(
        Next({ dev: true }),
      /* null means that nest-next
          should look for pages in root dir */
      { viewsDir: null },
    ), //추가된 부분3
    RecordsModule
  ],
  controllers: [AppController],
  providers: [AppService],
})
export class AppModule {}
4. app.controller.ts 수정
// ./src/app.controller.ts
import { Controller, Get, Render } from '@nestjs/common';
import { AppService } from './app.service';

@Controller()
export class AppController {
    constructor(private readonly appService: AppService) {}

    @Get()         //1. localhost:3000으로 get요청시,
    @Render('index')    //2. pages에 있는 index를 렌더링
    home() {
        return {};
    }
}
여기까지 하고 실행해봅시다.
서버가 제대로 통합되었는지 확인하기 위해서, pages/index파일에 서버통합완료라는 문구를 추가해보겠습니다.
import { FC } from 'react';
import { Typography } from 'antd';

const { Title } = Typography;

const Home: FC = () => {
  return (
    <div>
      <Title mark level={3}>
            가계부 'AKKEO'에 오신 것을 환영합니다.
            서버통합완료.
      </Title>
    </div>
  );
};

export default Home;
지금까지 프론트 실행을 위해서 yarn start:next 명령어를 실행했었죠? 이제 서버가 통합되었기 때문에, 아래의 명령어만으로 우리의 애플리케이션을 실행할 수 있습니다.
$ yarn start:dev
어 그런데,
error : [ExceptionHandler] Could not find a production build in the ‘디렉토리명/housekeeping-book/.next’ directory.
에러가 발생하는데요(^^;;;), 이 경우는 NEXT프로젝트를 빌드를 안해서 생긴 에러입니다.
$ yarn build:next
를 실행 후, 다시 $ yarn start:dev를 실행해주세요.
http://localhost:3000/에서 확인해 봅시다!
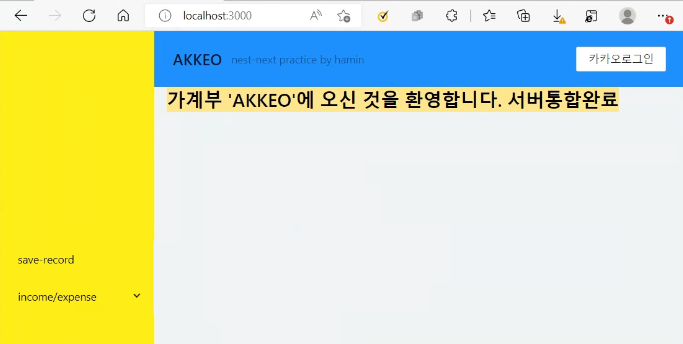
끝! 수고하셨습니다~!
Comments